How to Conduct a Candle Burn Test: A Complete Guide for Candle Makers
Burn testing is one of the most important—and often overlooked—steps in candle making. Whether you’re a hobbyist experimenting with new fragrances or a professional candle maker preparing products for sale, conducting proper candle burn tests ensures safety, performance, and customer satisfaction.
A beautiful candle that smells amazing on cold sniff can still fail if it tunnels, produces excess soot, or burns unevenly. Burn testing helps you catch these issues before your candle ever reaches a customer’s home.
In this guide, we’ll walk you through exactly how to conduct a candle burn test, what to look for at every stage, how long to test, how to document results, and how to troubleshoot common problems. By the end, you’ll have a repeatable testing process you can use with confidence for every candle you make.
What Is a Candle Burn Test?
A candle burn test is a controlled evaluation of how a candle performs while burning. It measures factors like:
- Melt pool size and depth
- Wick performance
- Flame height and stability
- Soot production
- Heat buildup in the vessel
- Burn time and efficiency
Burn testing isn’t just about aesthetics—it’s about safety, quality, and consistency. Proper testing helps reduce risks like overheating containers, smoking wicks, or candles that self-extinguish.
Why Candle Burn Testing Is Essential
1. Safety Comes First
Burn testing helps ensure your candle burns safely from first light to final burn. Overheated vessels, excessive flames, or unstable wicks can pose serious fire hazards.
2. Consistent Customer Experience
Customers expect candles to burn evenly, smell great, and last. Testing helps eliminate tunneling, weak scent throw, and excessive mushrooming.
3. Product Confidence
If you sell candles, burn testing protects your brand. A properly tested candle reduces complaints, returns, and liability concerns.
4. Required for Selling Candles
While regulations vary, responsible candle makers always test before selling. Many insurance providers also expect documented testing practices.
When Should You Burn Test a Candle?
You should conduct a burn test any time you change:
- Wax type or blend
- Wick size or series
- Fragrance oil
- Fragrance load percentage
- Vessel size, shape, or material
- Dye or additive
Even a small change can significantly affect burn performance. Never assume a candle will behave the same just because it’s similar to a previous version.
What You’ll Need for a Candle Burn Test
Before you begin, gather the following:
- Fully cured candle (minimum 48–72 hours, longer for some waxes)
- Wick trimmer
- Ruler or caliper
- Heat-resistant surface
- Notebook or burn test log
- Timer or clock
- Infrared thermometer (optional but helpful)
Testing in a draft-free, room-temperature environment will give you the most reliable results.
Step-by-Step: How to Conduct a Candle Burn Test
Step 1: Prepare the Candle
Trim the wick to ¼ inch before lighting. This is the industry standard and ensures a controlled flame.
Place the candle on a heat-safe surface away from drafts, fans, vents, or open windows.
Allow the candle to reach room temperature before testing.
Step 2: Light the Candle and Start Timing
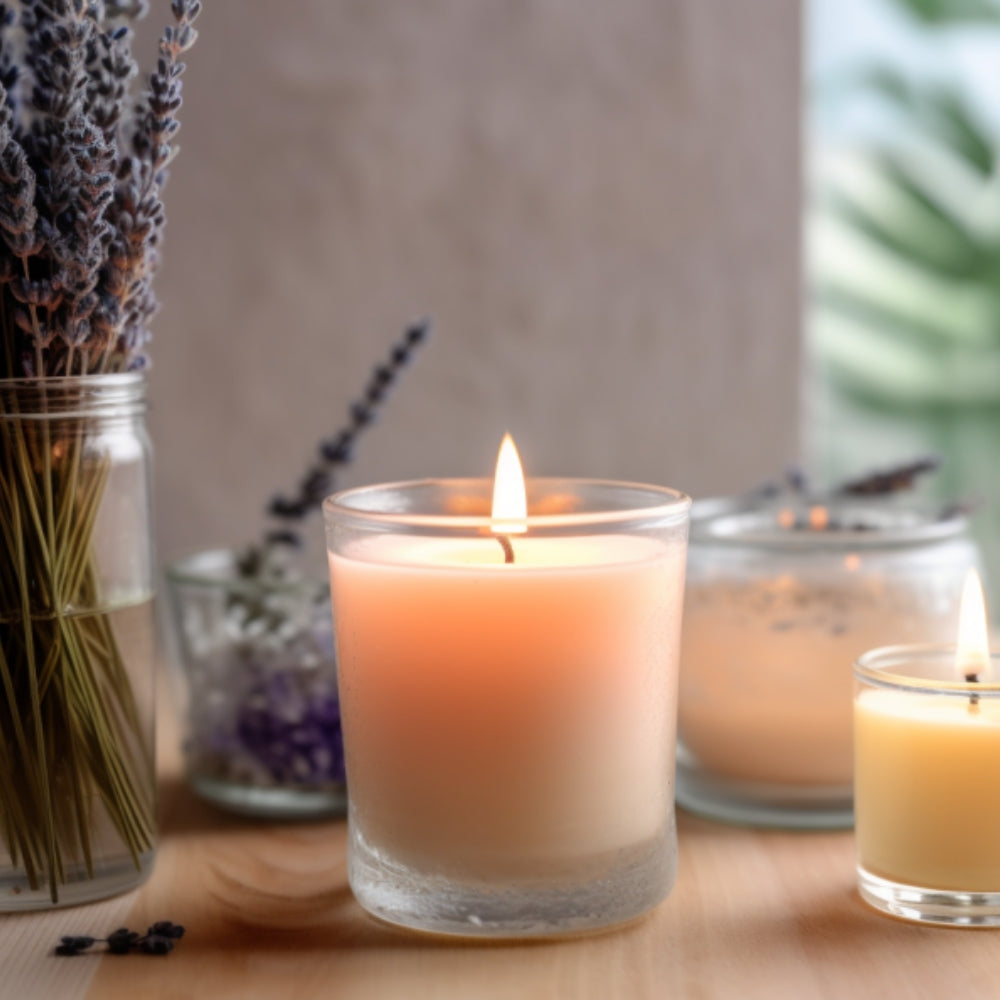
Light the candle and start your timer. Observe the flame during the first 10–15 minutes.
Take note of:
- Flame height
- Flickering or instability
- Immediate smoking or soot
A healthy flame is steady, upright, and approximately ½–1 inch tall.
Step 3: Monitor the Melt Pool
The melt pool is one of the most critical indicators of candle performance.
What to Look For:
- The melt pool should gradually reach the container edges
- Depth should be around ¼–½ inch
- Wax should melt evenly without excessive rippling
Timing:
A general rule is 1 hour of burn time per inch of container diameter, up to a maximum of 4 hours per burn session.
For example:
- 3-inch vessel → burn 3–4 hours
- 2.5-inch vessel → burn 2.5–3 hours
Do not burn longer than 4 hours in a single session.
Step 4: Measure Flame Height and Wick Behavior
During the burn, check:
- Flame height consistency
- Wick curling or leaning
- Mushrooming (carbon buildup)
Small mushrooms are normal, especially with fragrance oils. Excessive mushrooming indicates the wick may be too large or the fragrance load too high.
If mushrooming occurs, extinguish the candle, trim the wick, and continue testing after the wax solidifies.
Step 5: Check Vessel Temperature
Carefully touch the sides of the vessel or use an infrared thermometer.
The container should feel warm, not painfully hot. Pay special attention to:
- Upper third of the vessel
- Bottom of the container
Excessive heat may indicate an oversized wick or unsafe burn conditions.
Step 6: Extinguish, Cool, and Re-Trim
After the recommended burn time:
- Extinguish the candle (do not blow aggressively)
- Allow the candle to cool completely
- Trim the wick back to ¼ inch
Cooling fully between burns is essential for accurate results.
Step 7: Repeat Over Multiple Burn Cycles
A proper candle burn test is not a one-time event. You should test the candle over multiple burn sessions until at least ½–¾ of the wax is consumed.
This helps you evaluate:
- Performance as the candle burns lower
- Heat concentration near the bottom
- Wick behavior over time
- End-of-life safety
Some makers test all the way until the candle self-extinguishes.
How Long Should a Candle Burn Test Last?
Burn testing can take several days to a few weeks depending on:
- Candle size
- Burn schedule
- Number of test cycles
While it may feel time-consuming, thorough testing is what separates professional candle makers from hobbyists.
What to Record During a Burn Test
Keeping a burn test log is highly recommended.
Record the Following:
- Date and time of each burn
- Burn duration
- Wick size and series
- Wax type and fragrance load
- Melt pool diameter and depth
- Flame height observations
- Soot, smoking, or mushrooming
- Vessel temperature notes
- Any issues or changes observed
Detailed records make it easier to adjust and replicate successful formulas.
Common Candle Burn Test Problems (and What They Mean)
Tunneling
Cause: Wick too small, short burn time
Solution: Increase wick size or extend burn time during testing
Excessive Flame or Smoking
Cause: Wick too large, fragrance overload
Solution: Wick down or reduce fragrance load
Soot on Vessel
Cause: Drafts, oversized wick, improper trimming
Solution: Adjust wick size and environment
Weak Hot Throw
Cause: Wick too small, insufficient melt pool
Solution: Test a larger wick or different wick series
Overheating Container
Cause: Wick too large or vessel not suitable
Solution: Wick down or switch to heat-rated containers
How Many Wicks Should You Test?
Professional candle makers often test at least two to three wick sizes per candle style. This allows you to compare performance and choose the safest, most efficient option.
Never assume the largest wick is best—bigger is not always better.
Single-Wick vs Multi-Wick Burn Testing
Single-Wick Candles
Focus on:
- Full melt pool reach
- Flame stability
- Even consumption
Multi-Wick Candles
Test for:
- Balanced flame height between wicks
- Even melt pool across the entire surface
- Heat buildup in wider vessels
Multi-wick candles require extra attention, especially near the midpoint and bottom of the burn.
Burn Testing for Different Wax Types
Each wax behaves differently:
- Soy Wax: Slower melt, sensitive to wick choice
- Coconut Wax: Excellent throw, can burn hotter
- Paraffin: Strong throw, higher soot potential
- Blends: Performance varies—always test thoroughly
Never skip testing when switching waxes, even within the same brand.
Burn Testing for Selling Candles
If you plan to sell your candles:
- Always test final production versions
- Use the exact materials customers will receive
- Maintain testing documentation
- Follow all recommended candle safety labeling guidelines
Burn testing is a key part of responsible candle making and brand credibility.
Frequently Asked Questions About Candle Burn Testing
How many times should I burn test a candle?
Until at least half the candle is consumed, ideally more.
Can I burn test multiple candles at once?
Yes, as long as they are spaced apart and monitored individually.
Should I test with dye and fragrance?
Always test the finished candle, not a plain version.
Do I need to burn test every scent?
Yes. Different fragrance oils can dramatically change performance.
Final Thoughts: Burn Testing Is Non-Negotiable
Candle burn testing isn’t glamorous, but it’s one of the most important steps in candle making. It protects your customers, your brand, and your peace of mind.
A well-tested candle burns evenly, smells amazing, and performs safely from the first light to the final glow. By following a structured burn testing process and keeping detailed records, you’ll build better candles—and a better candle business.
If you’re serious about candle making, burn testing isn’t optional. It’s the foundation of quality.
Leave a comment
This site is protected by hCaptcha and the hCaptcha Privacy Policy and Terms of Service apply.